Christopher Kimball’s Milk Street Television
Milk Street Thanksgiving
9/10/2024 | 26m 13sVideo has Closed Captions
Milk Street celebrates Thanksgiving with fresh takes on turkey, potatoes and pie.
Milk Street celebrates Thanksgiving! Matthew Card prepares a Two-Hour Turkey that saves you time in the kitchen and frees up your oven for other Thanksgiving favorites. Rosemary Gill streamlines sides with Milk-Simmered Mashed Potatoes. Last by not least, Christopher Kimball shares his best pie-making secrets with his all-time favorite Double Crust Apple Pie.
Problems with Closed Captions? Closed Captioning Feedback
Problems with Closed Captions? Closed Captioning Feedback
Christopher Kimball’s Milk Street Television is presented by your local public television station.
Distributed nationally by American Public Television
Christopher Kimball’s Milk Street Television
Milk Street Thanksgiving
9/10/2024 | 26m 13sVideo has Closed Captions
Milk Street celebrates Thanksgiving! Matthew Card prepares a Two-Hour Turkey that saves you time in the kitchen and frees up your oven for other Thanksgiving favorites. Rosemary Gill streamlines sides with Milk-Simmered Mashed Potatoes. Last by not least, Christopher Kimball shares his best pie-making secrets with his all-time favorite Double Crust Apple Pie.
Problems with Closed Captions? Closed Captioning Feedback
How to Watch Christopher Kimball’s Milk Street Television
Christopher Kimball’s Milk Street Television is available to stream on pbs.org and the free PBS App, available on iPhone, Apple TV, Android TV, Android smartphones, Amazon Fire TV, Amazon Fire Tablet, Roku, Samsung Smart TV, and Vizio.
Providing Support for PBS.org
Learn Moreabout PBS online sponsorship♪ ♪ ♪ ♪ - Of course, Thanksgiving is my favorite day of the year.
But as I get more experienced and older, I'd like to pare it down.
There are only three things, maybe four, that really matter.
The first is the turkey-- now, the problem with turkey is I only have one oven in Vermont, so I can't let it sit there for five or six hours.
I want it in and out fast.
Today, we're gonna show you how to get a turkey in and out of the oven in two hours; it's also going to be moist, and the white meat and the dark meat will be cooked perfectly.
So that's gonna simplify Thanksgiving.
Secondly, the mashed potatoes, now, they're not hard to do.
You boil them, you drain them.
Well, the question really is, why don't you cook the potatoes in the milk to start with instead of adding milk later?
And that makes a huge difference.
So we're gonna do milk-simmered mashed potatoes.
And finally, the most important thing of all, is the apple pie for me.
I think apple pie should be really simple.
It should taste like apples.
Don't put too many spices in it.
I won't argue about cinnamon, a little bit, maybe.
But we're going to give you some instruction about how to make pie pastry, how to roll out pie pastry, how to form the pie and what goes into the pie.
And we'll talk also about that fourth recipe, which is how to make the perfect gravy, so stay tuned, as we pare down and talk about the world's best Thanksgiving.
- Funding for this series was provided by the following: - MOWI salmon comes ready to cook, ready to grill, ready to season, or pre-seasoned and ready to eat.
In an assortment of flavors for an assortment of people.
♪ ♪ MOWI Salmon.
- We pass down traditions here.
We create and connect.
We enjoy special moments-- some simple, some grand.
The heart of your home is the kitchen.
The heart of your kitchen is The Galley.
♪ ♪ - A big, gorgeous bronze turkey looks terrific on the Thanksgiving table.
But it comes with a host of problems, though, right?
It takes up half your fridge.
It then hijacks your oven, right?
It takes like five or six hours.
So we've come up with a better, simpler plan.
And that's to spatchcock the turkey.
What that does is it takes a three-dimensional, amorphous blob like this turkey, and renders it into a two-dimensional plane that's gonna cook evenly with no fuss.
Turkeys have what's called a pope's nose there.
We're gonna cut that off, it's just a little bit of fat.
And we are gonna put that in our stock.
Before I spatchcock, I tend to dry the meat well, so it provides good grip.
You don't want this thing sliding around while you're trying to cut it.
And I tend to start at the cavity end, because you can see where the backbone comes out.
It gives you clear visuals.
And then we're just going to snip as close as possible to the backbone.
Then I'm going to cut the second side.
It's much easier to cut the second side.
I'm keeping my fingers a little distant so I don't accidentally snip those.
Thanksgiving should not start with a trip to the emergency room.
I've had it happen in my life, and I can't recommend it.
And there is the backbone that we just cut out.
As you can see, there's very, very little meat left on there.
You're going to save this; it really is gonna be the base for your stock.
It takes a little force to flatten it out, but I do sort of pull it out with one hand, and push down with the heel of my other hand.
You do want to hear the wishbone crack.
Hopefully, you got some good luck there, because that's what holds the breasts apart.
And at this point, we have now a turkey that is effectively a flat plane.
Now what we're going to do is dry brine the turkey.
Dried brining is every bit as effective as a wet brine.
It also produces crisper, more golden skin.
We're going to sprinkle the inside of the cavity with two teaspoons of kosher salt, rub it in, and just make sure it's really thoroughly coated.
We're going to flip it back over.
And we're going to finish that with one and a half tablespoons of kosher salt.
We're not going to add any more salt before roasting.
So this is really the seasoning step.
So I left the wingtips on.
These little tips can burn easily.
So what we're going to do is we're just going to tuck them right under the breast.
I'm going to transfer this to a rimmed baking sheet.
And this turkey's ready for refrigeration.
So two to 18 hours uncovered in the refrigerator.
Just leave it alone.
It'll be fine.
In that 18 hours, you can then go ahead and make stock to make perfect gravy.
So I pulled it out of the fridge, and it's rested for one hour.
Instead of using a metal rack, which a lot of turkey recipes use, we're going to make a raft out of really aromatic vegetables, which are going to help flavor the gravy.
Now, we're not going for a really nice mirepoix here.
We're just going to chop it up and get it in the pan.
I do like peeling my carrots, though.
I just cut those into two-inch segments, give or take.
Add those to our pan.
When you're cutting onion slices, you really want to follow the curve of the onion so they're all the same size.
So I start off with my knife almost parallel to the board, and we're aiming for roughly quarter-inch thick slices.
And angle my knife... ...around, then when I get to the middle point, I'm going to flip that onion over.
And make sure we have a really nice, safe, secure claw grip on that.
We're gonna add a couple of sprigs of fresh rosemary here.
It adds really nice depth, a piney flavor, works really well with turkey.
So I'm just gonna break those up and spread them out.
So I'm gonna put our turkey in.
And spread its legs out in the pan.
Get it pretty even.
To prevent the fat from burning in the pan, we're gonna add one cup of water.
At this point, we're gonna drizzle it with a little olive oil.
Just about a tablespoon.
So I'm just gonna rub that in.
It is well-oiled.
And now we're gonna finish it with just a little bit of pepper.
I tend to sprinkle high.
Leads to more even coating.
We've got a 425 degree preheated oven with the rack at the lowest position.
You want it on the lowest position possible, because if it were any higher, the skin's gonna brown before the meat cooks through.
Now the turkey's gonna cook for two hours until an instant read thermometer inserted into the thickest part of the thigh comes out at 165 degrees.
This turkey looks gorgeous, and it smells even better.
Of note: you don't pull a turkey out of the oven and carve it right away.
It's gotta rest for at least 20 minutes before you carve it.
Gonna let everything drip back in.
And we're gonna put this on our cutting board.
So to break the turkey down, I really recommend having two knives.
One, a sort of short knife, and one the longest, sharpest knife you have.
So the first thing I'm going to do is I'm going to use a smaller knife to take the legs off.
And this is pretty easy because they sort of want to fall off at this point.
So I'm going to cut the skin close to the breast in just small motions and it just pulls right off.
You can cut straight down, right through the joint.
And you end up with another drumstick.
And that beautiful thigh.
And at this point, I like to take the wings off.
Now, the wings are joint.
So you can just cut right through there and loosen it up and sort of hold it and just pry it right out.
You can cut straight down through the joint.
So we have the pieces of the wing there.
Now comes the breast.
I'm going to run that knife right along the spine and cut down.
And I'm using small cuts with the tip of that knife.
And then I'm going to start pulling that meat back to open up the space so I can get my knife in without leaving meat on the bone.
And there you have the breast off the bone.
So now we're going to slice that.
So I'm going to hold it with my tongs, and then I'm going to slice using the whole length of the knife, as you can see.
I'm not cutting it too thin.
One thing I don't carve up is the legs, because somebody inevitably, at the table wants to be Henry VIII and eat the leg like that.
So let's just go ahead and put the legs on.
And the thigh, remember, has just a bone running down the middle.
So you can just cut around that bone.
The beautiful dark meat.
And let's see, we can put those wings on, tuck them in there, and we're gonna have a beautiful turkey platter with all that beautiful bronzed meat.
That's gorgeous.
That is really sort of perfect.
And I am gonna go ahead, I'm gonna grab that.
Perfectly seasoned, the skin is really crisp.
We didn't add a ton of herbs, or seasonings, or different flavorings.
So the flavor of the meat stands loud and clear.
And it's something I really love about this recipe.
We're not futzing with it.
We're just leaving well enough alone, roasting it quickly, high and hot.
And it is well seasoned because we did dry brine it.
So it really is just the perfect turkey to match the Thanksgiving table.
Mm.
(phone ringing) - Hi, this is Greg.
You know, I cook turkey for thanksgiving.
I cook it for Christmas, but I always have the same couple problems.
It's mostly with the gravy.
Normally, I put maybe two tablespoons of flour in the roux for every cup of stock.
It comes out about the right thickness, except the roux seems to kind of overwhelm the turkey flavor.
I'm not really sure how you find the balance.
- Thank you for the question, Greg.
Making gravy can be a little tricky and a little hair-raising on Thanksgiving Day.
You used a roux, which is very common, butter and flour cooked in the pan and then stock added.
We prefer making a slurry out of cornstarch and water to thicken our gravy.
So we took our turkey, took the giblets out, the neck, and we made a nice base stock.
What you want to do is measure how much stock you have.
So we're right at a quart there.
And now I have the turkey drippings also from the roasting pan.
So I want to strain that and then add that to my base turkey broth.
So now I'll have a look.
I have five cups of broth here.
So I need five tablespoons of cornstarch in a slurry to thicken this pot of gravy.
So five cups of broth, one tablespoon per.
That's gonna give me a quarter-cup plus a tablespoon.
And then you want to whisk in roughly an equal amount of water.
The nice thing about a cornstarch slurry, too, is you cannot taste it.
You make a roux.
Sometimes you can taste that flour in there.
So I feel your pain, Greg.
Okay, so once this is at a simmer, I'm going to take my slurry and then whisk it in.
As the slurry heats up in the gravy, the cornstarch swells, absorbs some of the broth and thickens the gravy.
The thing about this kind of gravy, with a cornstarch slurry, it's going to thicken up a little more as it cools.
If it seems too thin to you at this point, you can very easily add another tablespoon of cornstarch slurry to it to get it to where you want it.
So take our advice and go with a cornstarch slurry to thicken your broth.
It's the easiest way to make gravy.
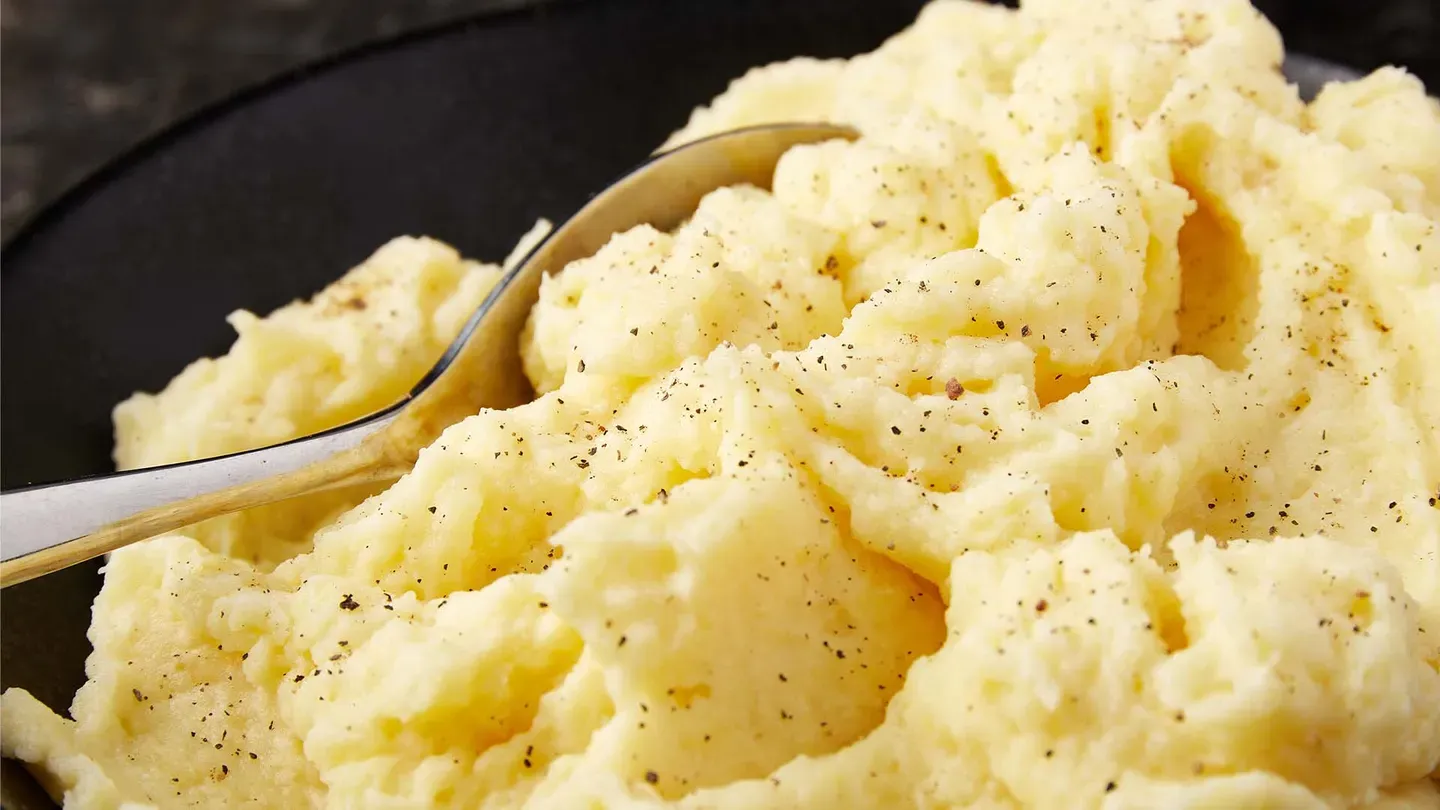
♪ ♪ - Mashed potatoes are arguably the most important part of Thanksgiving.
I know that's a contentious statement, but most people really love them, and unfortunately, they're set up to fail, because you have to make them right before you serve them, you're tired, you're covered in turkey grease, and you just want to sit down and eat.
We have a new approach to mashed potatoes.
You still have to make them at the last minute, but we streamline the process.
So to start, very familiar characters here.
Potatoes-- we tried this with a few different types of potatoes.
Russets didn't really work, so we're going to go with the Yukon gold; you only need about two pounds.
However, this serves four, maybe three.
You can scale this up easily; you just scale everything up.
Double it, triple it-- you can even quadruple it.
We're cutting them into fairly small pieces.
You want about half-inch.
You can go right into the pot.
The starch in these potatoes is key.
I know a lot of Thanksgiving is about make ahead.
You don't want to peel these and hold them in water.
Why?
The water ends up getting all the starch.
The starch is really important for the creamy texture we're looking for in these potatoes.
Okay, so we have our two pounds of potatoes.
We're gonna add two and a half cups of whole milk.
Don't skimp on the fat here.
You don't want 2% or low fat milk.
We need the fat to help get the texture we're looking for.
You also want to add in a little bit of salt, about a teaspoon.
And we're going to bring this up to a simmer.
What you're looking for is for this to cook until the potatoes are really falling apart and the milk is going to be mostly absorbed in them.
Again, we're not losing any of the starches.
Just by keeping it this simple.
We're getting a more streamlined path to creamy mashed potatoes.
You do want to keep the milk at a gentle simmer and stir it occasionally.
If you don't, the sugars from the milk can scorch on the bottom.
Okay, these are nice and soft.
Most of the milk has been absorbed, as you can see.
And now we just want to add some butter and mash them.
This was four tablespoons of butter, by the way.
This is another reason these are great.
You don't have to get out your stand mixer or another bowl.
You just mash them directly in the pot you cooked the potatoes in.
I know I'm gonna want pepper, so I'm just gonna add a little, like half a teaspoon.
Right amount of black pepper, right amount of butter, right amount of milk.
Perfect-- they're velvety, they're fluffy, and they took way less time, created many fewer dishes, right before I get to serve my loved ones at my holiday table.
♪ ♪ - So let me start with an apology.
Cause I'm about to annoy most of you.
Cause I've made hundreds of pies, you know, a couple hundred apple pies.
And I have very strong feelings as everybody at Milk Street knows about this.
So the basic formula for pie, any kind of American pie, is this: a cup and a quarter of flour, tablespoon of sugar, quarter to a half-teaspoon of salt.
We're doing a double crust pie, it's apple pie, of course.
Two and a half cups of all-purpose flour, a little bit of salt, and two tablespoons of sugar.
So that's the basic American pie dough formula.
I'll just pulse that.
The fat-- so traditionally people used a leaf lard, and I use that too.
Actually, I have some in my refrigerator in Vermont that one of my kids made.
The stuff you buy at the supermarket is not leaf lard.
That is, it's fat from other places in the pig.
So I don't highly recommend that.
What I do recommend is half butter, that's eight tablespoons of butter, and half vegetable shortening, preferably not hydrogenated.
You want to chill the butter for about 15 minutes in the freezer once you cut it up.
So the reason you use a combination is the lard, the vegetable shortening, gives you slightly better texture.
So put that in.
And then the butter, of course, is there for flavor.
Now, please sit down, because I'm really going to annoy you now.
Every bloody recipe for pie pastry talks about not cutting the fat all the way into the flour.
It's true that in American pie pastries, there usually are bigger pieces of fat.
And people think that makes a flakier dough.
The problem with that is it makes it really hard to create a dough that's easy to work with.
So my strong suggestion to you is cut the fat into the flour.
And you can get a great pie dough by cutting it in.
So I'm gonna cut it in, maybe 12, one-second pulses.
So now you can really see that's the right texture.
Now some people suggest adding the water to the food processor.
That's a mistake because you wanna get your hands on this to really feel when you've added enough.
I see recipes that say for a cup and a quarter of flour with three to four tablespoons of water, so it would be six to eight tablespoons for double that.
Forget that; it doesn't-- it's totally useless.
So I just have a bunch of water here and I don't measure it.
If you don't add enough water, you're not going to be able to roll it out.
It's going to fall apart, it's going to be too dry, so I would rather have enough water, so it really comes together.
Now you can see it's starting to come together.
Now, what I do, once I have that, I'll add a little bit of flour back to the bowl.
It's very malleable.
So your number one objective in making pie dough is creating something you can work with.
You can actually get it rolled out to 12 or 14 inches, whatever you need to do, and get it into the pie pan-- if you can't do that, you're not going to make a pie.
So now I'm just going to cut it.
Okay, so now we're just going to cover it and wrap, or put it in a bag-- I suggest you do this the day before.
Leave it in the fridge overnight.
It'll hydrate evenly, it'll rest.
So we're going to put these in the fridge, let everything relax, and we'll come back and start rolling out.
So, rolling 101.
If it's really hard, you might... ...beat it up a little, and then use a little bit of flour on the top, not too much.
A tapered rolling pin is great if you're making circles, obviously.
The objective here is to put your, if you're right-handed, your left hand here, and then roll in an arc like that, about a 90 degree arc.
Turn the dough, do it again.
If you see an edge that's too thick, you'd roll over it a little bit more.
So now you're starting to get to, like, ten inches or so.
And this is the part when you change up the method.
So you flip that on the rolling pin.
So if I see, for example, here, maybe I want to extend that out a little bit, right?
So it's a combination of that same turn.
But then I'm also rolling from the center out to make sure that it's a real circle.
So I'm just gonna put this on the baking sheet.
We'll put that in the fridge while we're preparing the apples.
The whole point of an apple pie is the apples.
And so some of the old varieties-- the sheepnose, Rhode Island Greening, Braeburn-- some of these had kind of rough skins, but a lot of them had interesting flavors.
They weren't just sweet.
If you can find those apples, just get a whole bunch of them, use three or four varieties, throw them together in a pie.
That's what makes a great apple pie.
The problem with apple pies now is apples are very one dimensional.
Other thing you have to think about is some apples are pie apples-- that is, they don't break down as much as others.
The Macintosh breaks down.
The Granny Smith, which I think is the most hideous apple ever invented, has horrible skin, it's kind of dry, but it's great when you bake with it.
So just as a failsafe, half Macs, half Granny's.
I usually put a fair amount of lemon juice in them.
Tends to keep them from oxidizing.
There are a lot of things you can put in here.
The first thing you can put in here is a little lemon zest.
I don't think that's very controversial.
We'll start with a third of a cup of sugar, add some salt; a lot of recipes don't add salt, which is kind of crazy.
Flour.
And that'll help thicken them a little bit.
So I'll just put in a tablespoon.
And now we get, now we get to the million dollar ingredient, which is-- ta-da-- the cinnamon.
Cinnamon is probably the strongest spice in your cabinet, or at least for baked goods, right?
The problem is it's going to overcome the flavor of the apples.
And hopefully you've spent time to get some nice apples.
So I'll use maybe a quarter-teaspoon, okay?
You just want a hint of cinnamon.
And, if you like, a little nutmeg.
I'm just going to use my hands.
Okay.
So we're going to put the pastry over, obviously, the pie plate.
You want to make sure it's really down into the plate.
Then the question is, how much dough do you leave outside of the rim?
So I'm going to go in and get pretty close to the edge of the pie plate.
You put your fingers underneath it.
I can feel where the edge is.
Okay.
Now, I don't know if we're going to get all of these in there, so I'm just going to put as many as I can in.
That's about it, I think.
The next question is, how much overlap do I leave on the top crust?
I'd leave about that much, because I'm going to take the top crust and put it underneath the bottom crust.
Hopefully, that way, we're going to seal in, you know, the juices aren't going to leak out the side.
Okay.
I don't like using the fork method.
I like this method better.
All right, that's pretty good.
Vents?
Yes, you need some vents.
I just do one in the center, and then one each on either side.
Now, I found, oddly enough, the water gives you a nice, clean glaze with the sugar.
I don't like that sort of dark yellowish color you get from the egg.
It looks like it's a little old to me.
By the way, anytime I make an apple pie, this is the best part of the day because you're finished.
You're just sprinkling the sugar on, it's going into the oven.
All the anxieties about making the pie are over.
It's time to sit down and relax.
And then it's about a tablespoon or two of sugar.
Be generous with it and you'll be surprised what a really nice, shiny glaze you're going to get with the sugar.
You're going to want to start this in a 425 oven for 20 minutes or so.
Reduce the oven to 375.
With those cuts here, you want to see the bubbles coming up.
You want to see the juice bubbling.
What you want to make sure is the crust actually gets cooked through.
And also that browning is going to give you a lot of flavor.
So that doesn't look bad, does it?
I like the fact it doesn't have that yellowish, sort of, old Dutch Masters look to it with the egg yolk.
What you want in that first bite is you want fresh apple taste.
You want the citrus, you want fresh fruit.
You don't want it to taste old.
You don't want to taste like, you know, my mother's spice drawer, which had been around for 20 years.
Mm.
Bright, fruity, buttery, flaky pie dough.
The texture of that combined with the apple, this is nature's most perfect food.
So this is my recipe, our recipe here at Milk Street, for a great apple pie.
Please give it a shot because I think once you try this style, it's clean and natural and bright, I think you'll decide this will be your favorite apple pie as well.
You can get this recipe for apple pie and all the recipes from this season of Milk Street at MilkStreetTV.com.
And a very happy Thanksgiving to you and your family.
And please, serve apple pie.
- Recipes and episodes from this season of Milk Street are available at MilkStreetTV.com, along with shopping lists, printer-ready recipes, and step-by-step videos.
Access our content anytime to change the way you cook.
- The new Milk Street Cookbook is now available and includes every recipe from our TV show.
From cacio e pepe and skillet spanakopita, to Brazilian-style carrot cake and Thai coconut soup, the Milk Street Cookbook offers bolder, fresher, simpler recipes.
Order your copy of the Milk Street Cookbook for $27, 40% less than the cover price.
Call 855-MILK-177 or order online.
- Funding for this series was provided by the following: - MOWI salmon comes ready to cook, ready to grill, ready to season, or pre-seasoned and ready to eat.
In an assortment of flavors for an assortment of people.
MOWI Salmon.
- We pass down traditions here.
We create and connect.
We enjoy special moments-- some simple, some grand.
The heart of your home is the kitchen.
The heart of your kitchen is The Galley.
♪ ♪ ♪ ♪


Support for PBS provided by:
Christopher Kimball’s Milk Street Television is presented by your local public television station.
Distributed nationally by American Public Television